How to cut border fabric so the pattern is straight
If you’ve been quilting for any length of time, then you’ve probably come across a fabric that isn’t printed straight on the grain. For some fabrics, that doesn’t matter, for others, it can really look off when you cut it up to include it in a quilt.
The effect of cutting a print that isn’t straight is amplified when you use it in a border. As the fabric travels along the length of the quilt it just becomes more and more obvious that the pattern isn’t straight. It makes it look like you did sloppy work when cutting.
Stripes, chevrons and prints where motifs are laid out in a grid are particularly tricky, and will be the most obvious if they are off in your finished quilt.
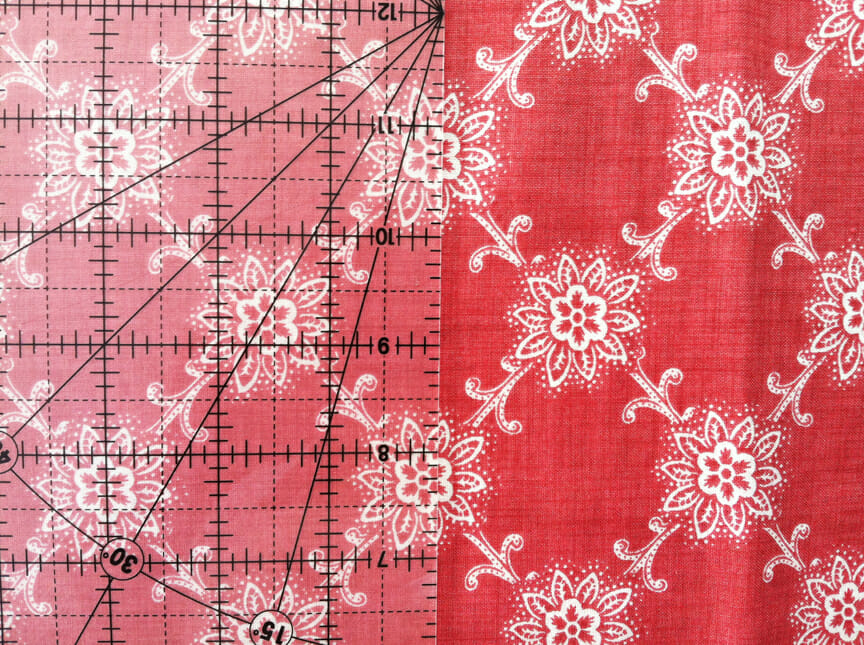
I ran into this problem when I was cutting the borders for my latest quilt. The fabric length I needed was just 30 inches at the longest part, but even with that short of a distance, the motifs were really far off the grain and it would have looked sloppy if I would have just cut across the width of fabric like normal.
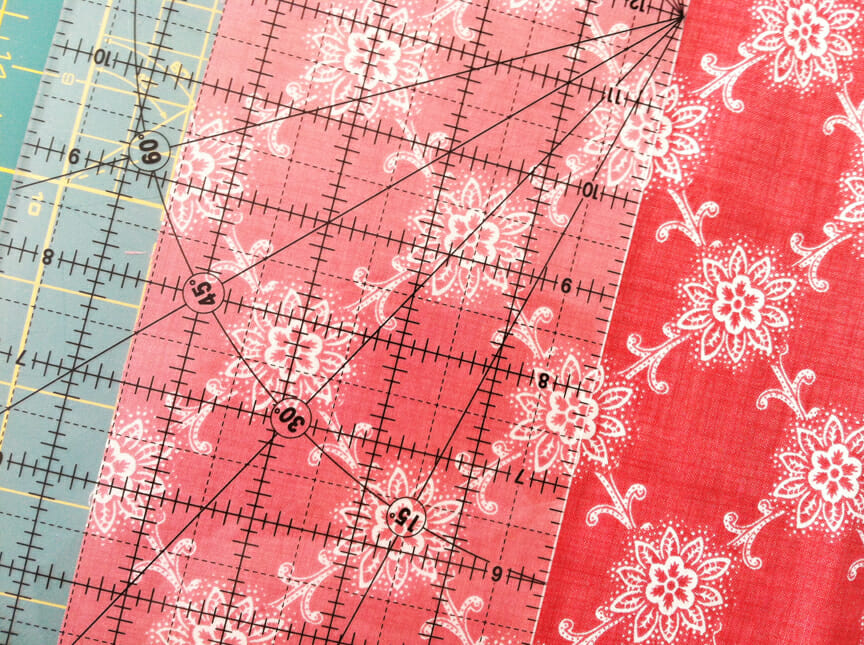
To get around that issue, I opened up the fabric so that I was only cutting one layer at a time. This allows you to focus on lining up the ruler with the print instead of the edge of the fabric and the folded edge. Then I picked a spot on the motif to line the edge of my ruler up with and lines the ruler up with that same spot on each motif along the length of the fabric. I left a little extra fabric hanging off the edge, an inch or so is good, to account for the uneven edge that will result from where it was cut off the bolt.
Then once I had the ruler lined up on the print, instead of following the straight of grain, I cut the fabric using my rotary cutter. You’ll then want to adjust your fabric and follow those same steps on the other side of the fabric since you’re just cutting one thickness of fabric at a time.
Any subsequent cut you make should already be lined up with the print, so you should be able to just cut your border to size, but do make sure you pay attention to where the edge of the ruler hits with the print to ensure it is even. If it isn’t, you may need to make further adjustments.
This process takes a little extra work, but it is so worth it to have a border that is lined up perfectly with the print. It’s paying attention to details like this that will help take your quilting to the next level.
And this method also works when you’re using stripes in piecing as well and you want them to be lined up square.


I see what you are saying. But since you are then not cutting your fabric on the straight of grain how will that affect the edges of the quilt when on the quilting frame? Will they become wavy? It isn’t exactly on the bias but you will have some bias type edges. Thanks for the article.
I always sew a stay stitch 1/8 of an inch away from the edge of my quilt before they go on the longarm. That helps keep the edges from fraying and stabilizes everything for the quilting frame. This quilt has already been quilted and it was perfectly square when it came off the frame. Here’s a tutorial with more info. https://www.quiltaddictsanonymous.com/2013/07/edge-stitch-your-top-for-a-better-quilting-experience/